 |
|
| node: | Mastering "Downsampling" |
| template: | 4 |
| parent: | Fototechnika |
| owner: | deadcat |
| viewed by: | |
| created: | 14.07.2007 - 15:33:12 |
|
cwbe coordinatez: 101 63537 758948 1102981 3248910 ABSOLUT KYBERIA |
| permissions | |
| you: | r, |
| system: | public |
| net: | yes |
total descendants::
total children::0
toto je len ta dolezita cast celkom slusneho clanku o downsamplingu
From 4000 ppi film scanner:
I start with a master scan that is approximately 7 x 11 inches at 500ppi. This means that I've already changed my 4000ppi master scans to 500ppi without resampling, or throwing any data away. Thus the 35mm scan that was about 1 x 1.5 inches (film size) at 4000ppi becomes about 7.4 x 11.2 inches (For details on what goes on in the scanning process, see the "master-scan" page-- in progress). I like this size as it will display in most browsers (those that are 800 x 600 pixels or larger) without undue amounts of scrolling, yet is large enough for a photo editor or designer to see the details in the image and make a decision. Our target image of the same size at screen resolution will be a 1.15mb RGB TIFF.
Ready?
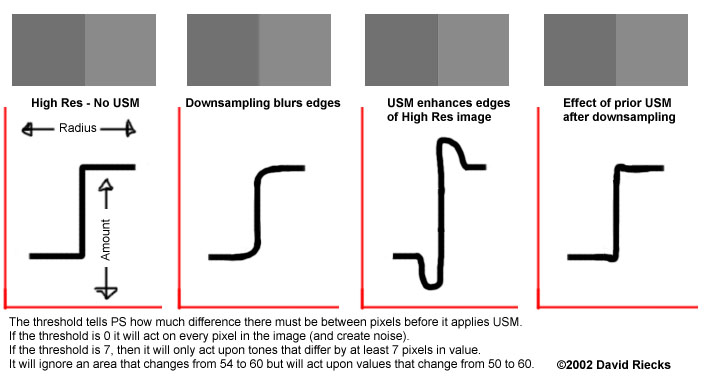
With the image open in Adobe Photoshop, and at 100 percent (Command/Control + Option/ALT + 0 [that's zero]), convert to LAB (Image, Mode, LAB), choose the "L" or lightness channel from your "Layer" palette (To open Layers, go to "Window," then "Show Layers" and select the "L" or lightness layer), and apply a USM of 150 amount, .5 radius, and 7 threshold (Filter, Sharpen, Unsharp Mask). Observe the results to determine that there are no obvious halos (this may require moving around the image using the navigator, scroll, or hand tools). If you see any "really annoying" halos these can be fixed using the snapshot or history functions.
The idea here is not to hammer the image with USM, but to simply hold on to the fine detail that would otherwise be obliterated by math rounding errors introduced when going from a very large file to a very small file. If you think you can't see the difference, use undo to toggle between before and after (command/control + Z).
If you are wondering why you are looking at what appears to be a weak b&w image don't be concerned. This is the "luminosity" layer which holds the sharpness of your image. Look at the A and B channels, and what you will notice is the distinct lack of sharpness in the image. This is the advantage of using LAB. We could do all the work in RGB, but it would require first applying the USM filter, and then using the Fade command and choosing Luminosity mode to get the same result. Only problem is you are processing the R, G, and B layers twice, and it takes more time since we will have to USM and downsample the image about five times before we hit our target resolution of 72ppi.
With that in mind, now select Image, Image Size, and with the Resample box checked, change the resolution from 500 to 350 (from here on out I will refer to this as "downsampling". This should drop the file size of the image by approximately half. Click on OK. Now apply a USM of amount 140, .4 radius, and 7 threshold. Check for obvious halos and if necessary remove or fade.
Downsample from 350 to 247ppi, again the file size should be about half of what it was before. Apply another dose of USM, this time at 130 amount, .3 radius, 7 threshold. Look for obvious halos and if necessary remove or fade.
Downsample again to 172 ppi. Apply USM at 110 amount .3 radius, 7 threshold. Check for obvious halos.
Downsample yet again to 122 ppi. Apply USM at 100 amount .3 radius, 7 threshold. Check for obvious halos.
Downsample to 72ppi. If you are preparing images for web only, you may wish to apply one more "hit" of USM, its your discretion. I typically wait and do that just before or during the creation of a Jpeg for web use.
Convert back to RGB colorspace (Image, Mode, RGB).
cele na http://www.controlledvocabulary.com/imagedatabases/downsampling.html
From 4000 ppi film scanner:
I start with a master scan that is approximately 7 x 11 inches at 500ppi. This means that I've already changed my 4000ppi master scans to 500ppi without resampling, or throwing any data away. Thus the 35mm scan that was about 1 x 1.5 inches (film size) at 4000ppi becomes about 7.4 x 11.2 inches (For details on what goes on in the scanning process, see the "master-scan" page-- in progress). I like this size as it will display in most browsers (those that are 800 x 600 pixels or larger) without undue amounts of scrolling, yet is large enough for a photo editor or designer to see the details in the image and make a decision. Our target image of the same size at screen resolution will be a 1.15mb RGB TIFF.
Ready?
With the image open in Adobe Photoshop, and at 100 percent (Command/Control + Option/ALT + 0 [that's zero]), convert to LAB (Image, Mode, LAB), choose the "L" or lightness channel from your "Layer" palette (To open Layers, go to "Window," then "Show Layers" and select the "L" or lightness layer), and apply a USM of 150 amount, .5 radius, and 7 threshold (Filter, Sharpen, Unsharp Mask). Observe the results to determine that there are no obvious halos (this may require moving around the image using the navigator, scroll, or hand tools). If you see any "really annoying" halos these can be fixed using the snapshot or history functions.
The idea here is not to hammer the image with USM, but to simply hold on to the fine detail that would otherwise be obliterated by math rounding errors introduced when going from a very large file to a very small file. If you think you can't see the difference, use undo to toggle between before and after (command/control + Z).
If you are wondering why you are looking at what appears to be a weak b&w image don't be concerned. This is the "luminosity" layer which holds the sharpness of your image. Look at the A and B channels, and what you will notice is the distinct lack of sharpness in the image. This is the advantage of using LAB. We could do all the work in RGB, but it would require first applying the USM filter, and then using the Fade command and choosing Luminosity mode to get the same result. Only problem is you are processing the R, G, and B layers twice, and it takes more time since we will have to USM and downsample the image about five times before we hit our target resolution of 72ppi.
With that in mind, now select Image, Image Size, and with the Resample box checked, change the resolution from 500 to 350 (from here on out I will refer to this as "downsampling". This should drop the file size of the image by approximately half. Click on OK. Now apply a USM of amount 140, .4 radius, and 7 threshold. Check for obvious halos and if necessary remove or fade.
Downsample from 350 to 247ppi, again the file size should be about half of what it was before. Apply another dose of USM, this time at 130 amount, .3 radius, 7 threshold. Look for obvious halos and if necessary remove or fade.
Downsample again to 172 ppi. Apply USM at 110 amount .3 radius, 7 threshold. Check for obvious halos.
Downsample yet again to 122 ppi. Apply USM at 100 amount .3 radius, 7 threshold. Check for obvious halos.
Downsample to 72ppi. If you are preparing images for web only, you may wish to apply one more "hit" of USM, its your discretion. I typically wait and do that just before or during the creation of a Jpeg for web use.
Convert back to RGB colorspace (Image, Mode, RGB).
cele na http://www.controlledvocabulary.com/imagedatabases/downsampling.html